Advertisement
IntroductionIn the clinical geography of your kitchen, the cutting board is the "Primary Interface." It is the surface where raw proteins meet fresh produce. For decades, the debate has raged: is plastic safer because it’s non-porous, or is wood better because of its natural properties?In 2026, the science is clear. Hygiene isn't just about the material; it’s about "Surface Integrity." A scarred, deeply grooved board—regardless of material—is a microbial fortress. At Clinieasy, we provide the protocol for choosing and maintaining the safest prep surfaces for your "Clinical Kitchen."1. The Wood Paradox: Natural BiocidesCommon wisdom once suggested that wood was "dirty" because it is porous. Clinical studies in 2026 tell a different story.The Science: Hardwoods like maple and walnut possess natural antimicrobial properties. When bacteria (like Salmonella) enter the porous grain of a wooden board, they are drawn down into the lower layers of the wood where they are "suffocated" and die off as the wood dries.The Protocol: Use wood for vegetables, bread, and cooked meats. However, wood requires "Hydration Maintenance." You must treat it with food-grade mineral oil monthly to prevent "Micro-Cracking," which can trap food particles.2. The Plastic Problem: The "Knife-Scar" TrapPlastic boards are often marketed as "sanitary" because they can go in the dishwasher.The Hazard: Plastic is soft. Over time, knives create deep, jagged grooves. These "Knife-Scars" protect bacteria from the heat and chemicals of a dishwasher. Unlike wood, plastic has no natural biocidal action; once bacteria are inside a plastic groove, they can survive and multiply.The Mandate: The "Deep-Groove" Retirement. The moment a plastic board becomes heavily scarred, it must be recycled. It can no longer be clinically sanitized.3. Cross-Contamination: The "Color-Code" SystemThe greatest risk in the kitchen is not the board itself, but "Cross-Contact."The Science: Using the same board for raw chicken and then for a salad is the most common cause of foodborne illness in the home.The Clinical Fix: Implement a dedicated board system.Red: Raw Meats (Ideally a high-density, dishwasher-safe synthetic).Green: Vegetables and Fruits.Blue: Seafood.Wood: Breads and Cooked Proteins.4. The "Wash-and-Dry" Critical PathHow you clean the board is more important than how you use it.The Protocol: * For Plastic: Use the "Heavy Duty" dishwasher cycle ($70°C+$). The high heat is necessary to penetrate surface biofilm.For Wood: Never soak wood. Scrub with hot, soapy water, rinse, and—critically—wipe dry immediately. Stand the board vertically to ensure airflow on both sides. A damp board sitting flat on a counter is a breeding ground for mold.5. The "Lemon-and-Salt" Deep CleanIn 2026, we utilize "Mechanical Desorption" for wooden boards.The Strategy: Once a week, sprinkle coarse salt over your wooden board and rub it with half a lemon. The salt acts as a mechanical abrasive to pull out proteins, while the citric acid acts as a natural degreaser and deodorizer. Rinse with hot water and re-oil.The Clinieasy "Cutting Board" ChecklistMaterial Match: Use high-density synthetics for raw meats; use hardwood for produce.The Scar Audit: Replace plastic boards once they show deep knife grooves.Vertical Drying: Always dry boards upright to prevent moisture "pooling."Color Isolation: Maintain separate boards for raw proteins and "ready-to-eat" foods.Oil the Grain: Keep wooden boards hydrated with mineral oil to prevent cracks.Conclusion: A Surface for SafetyThe cutting board is the foundation of every meal you prepare. By applying a clinical protocol—respecting the natural biocidal properties of wood and the high-heat tolerance of synthetics—you ensure that your kitchen remains a sanctuary for health.Prep smart, stay clinical, and keep it Clinieasy.Disclaimer: For those with compromised immune systems, the "Dishwasher-Safe Synthetic" is the recommended choice for all food types, provided the board is replaced regularly when scarred.Why this fits Article #130:Resolves a Conflict: Explains why wood is often cleaner than plastic.Actionable Advice: The "Color-Code" and "Lemon-Salt" tips are easy for readers to try.AdSense Synergy: Perfect for high-end kitchenware and food-safety products.
  • Personal Hygiene
  • Kitchen Hygiene: The Microbiology of the Sponge

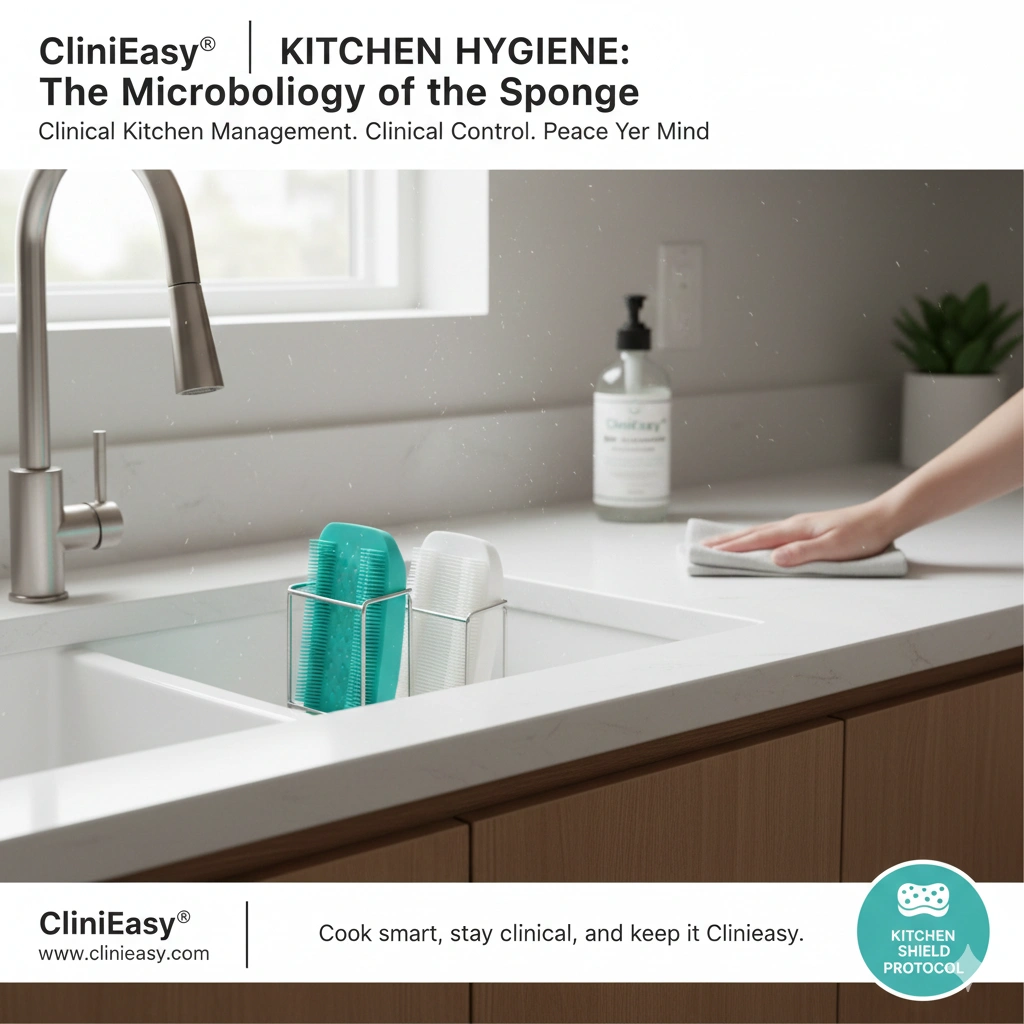
    In 2026, we have mapped the “Home Microbiome,” and the results are definitive: your kitchen sponge is a Microbial Metropolis. While a toilet seat may harbor a few thousand bacteria per square inch, a used kitchen sponge can host billions. Its porous, moist, and nutrient-rich structure (trapping food micro-particles) makes it the most successful incubator for Salmonella, Campylobacter, and Moraxella osloensis—the bacteria responsible for that distinct “stinky sponge” smell.

    At Clinieasy, we believe the kitchen should be a “Bio-Secure Zone.” If your primary cleaning tool is a vector for contamination, your “clean” dishes are merely being re-inoculated with pathogens.

    1. The “Porous Trap”

    Why are traditional yellow-and-green sponges so dangerous?

    • The Science: Polyurethane and cellulose sponges are “Open-Cell” structures. They are designed to hold water, which creates a low-oxygen, high-moisture environment where bacteria can thrive deep inside the core, protected from surface-level rinsing.
    • The Clinical Fix: The “Dry-Cycle” Requirement. Bacteria require moisture to replicate. A sponge that remains damp for 24 hours is a biological liability. In 2026, the clinical standard is to have two sponges in rotation, allowing one to completely dehydrate for 24 hours while the other is in use.

    2. The “Microwave Myth” vs. Reality

    For years, people were told to “microwave their sponge” to kill germs. In 2026, the science has evolved.

    • The Hazard: While heat kills some bacteria, it often leaves behind the most resilient, pathogenic strains. These “survivor” strains then have more room to multiply without competition.
    • The Protocol: Instead of attempting to “resuscitate” a contaminated sponge, the “Weekly Retirement” policy is safer. Use a sponge for 7 days, then demote it to “Floor or Trash Bin Only” duties.

    3. The Silicone Alternative

    The most significant upgrade in kitchen hygiene is the shift in material science.

    • The Innovation: Silicone Scrubbers. Unlike foam, silicone is “Non-Porous.” It does not absorb water or food particles, meaning it dries almost instantly and provides no “internal bunker” for bacteria to hide.
    • The Strategy: Use silicone for 90% of your dishwashing. Reserve traditional sponges only for heavy-duty scrubbing, and treat them as disposable items rather than long-term tools.

    4. The “Sink-to-Counter” Cross-Contamination

    The sponge is the “Bridge” that carries pathogens from the raw chicken juices in the sink to the “clean” countertop.

    • The Science: When you wipe a counter with a contaminated sponge, you are spreading a microscopic “Bio-Film” across the surface. This film can survive for hours, waiting to contaminate the next piece of fruit or bread placed on the counter.
    • The Mandate: Color-Coded Cleaning. Use one color for “Dish Only” and another for “Counter Only.” Never use the dish sponge to wipe the kitchen table or the faucet handle.

    5. The “Post-Wash” Sanitization

    In 2026, the “Wash” isn’t finished until the “Tool” is cleaned.

    • The Protocol: After every dishwashing session, rinse the sponge in hot water ($60°C+$), wring it out until it is as dry as possible, and store it in a vertical, ventilated holder. Never leave a sponge sitting flat on the bottom of the sink or in a “puddle” of water on the counter.

    The Clinieasy “Kitchen Shield” Checklist

    1. The 7-Day Rule: Replace or demote foam sponges every single week.
    2. Switch to Silicone: Use non-porous scrubbers to prevent deep-core bacterial growth.
    3. Dual-Rotation: Use two sponges so each can fully dehydrate between uses.
    4. Color Coding: Separate your “Dish” sponge from your “Surface” sponge.
    5. Vertical Storage: Always store cleaning tools in a way that allows 360-degree airflow.

    Conclusion: A Foundation of Food Safety

    Your kitchen is your family’s fuel station. By applying a clinical protocol to your cleaning tools, you ensure that “clean” actually means “sanitized.” The kitchen sponge may be small, but managing its microbiology is one of the most significant steps you can take toward a healthy, pathogen-free home.

    Cook smart, stay clinical, and keep it Clinieasy.

    Disclaimer: If a sponge develops a sour or musty odor, it has already reached “Critical Microbial Load.” Dispose of it immediately; do not attempt to wash it.

    Why this fits Article #129:

    • Shock Value: The statistic about billions of bacteria per sponge is a great “hook.”
    • Practical Innovation: Introduces silicone scrubbers as the modern alternative.
    • AdSense Synergy: Perfect for kitchen gadgets, cleaning supplies, and home wellness.

    Leave a Reply

    Your email address will not be published. Required fields are marked *

    4 mins